Lost Arts studio

A lot of the fiber arts I enjoy are things like tatting, netmaking, chair caning, and even weaving, where people will come up to me when I demonstrate and solemnly tell me, "That's a lost art."

My Photo
Name:
Location: SW Outer Nowhere, Michigan, United States

On the Internet, nobody knows you're a chicken. (With apologies to Peter Steiner.)


17 October 2009

We Had SUN Today!

Sunshine! And blue sky!

And I got to knit in actual daylight.

But, uh, now that it's dark again, I just realized I forgot to take any pictures except this one:


Another introvert shirt. Collect them all!

Labels: ,

14 August 2008

Discharging a T-shirt

Michael's, the craft chain, had t-shirts on sale 2/$5 this week, so I've been having a little fun.

When I made the Introvert shirt, I was in a hurry not to lose the idea, and didn't take any pictures.

These photos show how I did it. For the Introvert shirt I made a stencil of the letters instead of using leaves.

First I got this brand-new, unwashed shirt wet and wrung it out. Some people say you must wash them first to remove excess dye, but that depends on your patience level. You can discharge on dry material, and you will get sharper lines. Wet fabric will give slightly softer lines as the bleach migrates into the wet material.

The thingie in the picture is a Chlorox bleach pen, which is basically a tool for putting a weak bleaching agent on a stain. Mine is full of a cleanser called SoftScrub with bleach.

I brush all along the edges of the leaf with the big end of the bleach pen. You could also apply the bleaching agent with a synthetic-bristle paintbrush. The bleach will eat up the bristles of a natural-bristle brush.

When I was a kid, "cleanser" was a dry scrubbing powder like Bon Ami or Ajax that came in a can that you shook on a stain or into a toilet. These days in the US they sell a lot of wet cleansers, a slurry of dry powder cleanser.

If you live in a country that has never heard of such a thing, it's about a 2% solution of sodium hypochlorite (chlorine bleach). To me, the advantage is that the white scrubbing powder shows me where the bleaching agent is going without waiting for the fabric to turn colors.

(Before you ask, no, it doesn't eat the fabric right away.)

After I've brushed around the edges of the leaf, I have a leaf all limned with bleach. I find another spot on the shirt and press the leaf bleach-side downwards to use that up.

When I pick up the leaf, it leaves its image behind, sort of a Kirlian photography effect without the high voltage.
The other end of the bleach pen is narrow enough to use for drawing or writing with this stuff. I've rinsed the neck and sleeves so I don't have to worry about smearing it onto itself. You can see that the black dye is discharging orange.

After laundering and drying, the camera makes the black looks dusty, but the discharged areas are more orange and obvious.

My son watched me do this one. He says, "That shirt is cool! Can you make me one?" so I guess I need to buy another t-shirt.

Labels:

24 July 2007

Same Idea, Different Day

Also, "Same excuse, different day." I'm still on my summer posting schedule, which means some days summer interferes with my sitting down at the computer and typing up a blog post.

I didn't have a blog yet the year my fiber arts group had so much fun with discharging fabric. And that's too bad, because we had a great time, and I could have taken so many pictures and posted about them. This shirt is a descendant of some of those ideas.

"Discharge" is a fancy way of saying "Bleach". Well, mostly bleach. Anyway, you take fabric, manipulate it in various ways, and then remove or change the color it is dyed.

For example, we used plastic stencils and cleanser with bleach (the Chlorox bleach pen, Softscrub cleanser with bleach) to stencil on fabric. We sewed or tied or twisted the fabric using shibori or tie-dye techniques before bleaching. Or we just drew freehand on the fabric with a bleaching substance. It was fascinating.

Before I started, I took my bleach cleanser and tested it on the back inside hem of the shirt to see if it would discharge. When it started to look pink, I knew I had a winner. It's a good idea to test beforehand, so you know what color the discharged areas will end up. Purple sometimes discharges white, sometimes hot pink. Green can discharge to khaki. Black sometimes turns a sort of old gold. And some dyes won't discharge at all with chlorine bleach. But you don't know until you try it.

For this shirt (it's navy, but it's wet now and the camera sees it as almost black), first I printed out the word "Introvert" in a fancy font. Then I painstakingly cut out the letters with an Exacto knife. I saved the centers of the o, the fancy v, and the e, and the capital I.

I took a brand-new, unwashed, dry t-shirt, folded it at the bottom of the sleeves over a piece of cardboard, and used washable white glue to glue my stencil right on the fabric. For the hollow letters, I used the letter itself to center the piece that went in the middle of the O, V, E, and the I, and I glued the middles down.

I stuffed a plastic bag inside the shirt under the stencil, so the cleanser would not soak through from the front to the back.

Then I took my bleach pen (it's filled with "Softscrub with bleach" cleanser: different bleach cleansers give different results) and used the dauber end to apply the bleach cleanser to the shirt through my glued-down paper stencil.

I was very impatient to see if this was going to work, and I didn't wait for the white glue to dry. As a result, in some spots the cleanser discharged slightly where the paper was damp from the glue.

I let the cleanser sit on the dry fabric until I could see that the last letter I had daubed had changed color. Then I tore as much of the paper stencil off as I could. Finally, I put a plastic footbath full of water inside the shirt and soaked and scrubbed off the rest of the paper, the white glue, and the white abrasive from the cleanser.

In close-up, you can see the discharged spots that went through the glue. When I do this again, I'll try to be less impatient and let the glue dry!

Click to view my Personality Profile page

Labels:

13 April 2007

How to Spiral-Cut a T-Shirt

If you're looking for ways to embellish a t-shirt by cutting it, here are a couple of books on the subject:
99 Ways to Cut, Sew, Trim, & Tie Your T-Shirt, by Faith Blakeney and Generation T: 108 Ways to Transform a T-Shirt by Megan Nicolay.

But if you want to know how to get yards of yarn from an old t-shirt . . .

I finally decided my old purple t-shirt had had it, and that it was time to spiral-cut it into a long strip and add it to my knitted t-shirt-rag rug. The last time I mentioned this on a knitting list, I got questions about how I cut the strips, so I took pictures as I cut this one up.

It's very easy to do, but not so easy to describe without pictures.

You can also spiral-cut a sock. Even a crew sock yields a strip over three yards long. I use the strips for weaving rag rugs on my floor loom, and the all-cotton ones for weaving potholders on my little metal potholder loom. It can be hard to find all-cotton loopers, and a potholder made out of polyester loopers isn't safe -- it can melt and burn you.

I use a t-shirt with no side seams, just a straight tube. You can use shirts with side seams, but the seams are lumpy. Lay the shirt flat and cut it across just below the arms. If you are spiral-cutting a sock, cut the heel out and lay the sock flat.

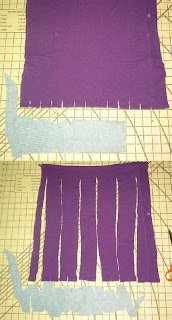
I've cut up a lot of t-shirts and socks, so I know about how wide I want them, depending on the thickness of the fabric. But you can have some variation and it won't show up much. I cut these a little over an inch wide. If you try one and decide it's too narrow or too wide, well, it was an old t-shirt, right?

Starting at the bottom, make short cuts as wide as you want your strips. If you don't have a cutting board, any big piece of cardboard will do. For years I used a piece of box cardboard. I used the groove where the box had been folded as a cutting guide, to help me cut roughly straight.

Cut towards the opposite edge, but STOP! about two inches before you get to the edge, otherwise you will just have a set of giant loopers. You will have a sort of fringe of dangling cut pieces, held together at the edge.

After you have made all your cuts almost all the way across, open up the uncut edge and put something inside it. A newspaper, a kid's book, a sheet of typing paper, cardboard, whatever is handy.

Now each of your cuts will be diagonals. You can see the first cut in the t-shirt going diagonally to the left edge. After that, you keep cutting diagonals: from the bottom left, cut up to the top left. This will make one long continuous strip.

After all of the diagonal cuts are made, the last step is to stretch the whole cut strip. Since it's made from a knitted t-shirt, this makes it curl up with the purl side out. It also rolls the cut edge up. I stretch the whole length, usually twice. Sometimes I throw it in the laundry in a lingerie bag after I cut and stretch it.

T-shirt material doesn't make too much mess, but socks will leave lots of little bits all over everything, including in the laundry.

Stretching it turns it from a flat cut strip into a nice smooth rat-tail, perfect for weaving or knitting with.

I am adding mine to a t-shirt rag rug, knitted in garter stitch on a US size 13 circular knitting needle. This is going to be a heavy rug, the kind that only dries in full July sunshine, or in front of a hot woodstove. It will be perfect for our bathroom floor, the coldest floor in the house.


I can knit about one row at a time on this before my hands scream at me to go knit something lighter.


Edited to add:

If you go to the On-Line Digital Archive of Documents on Weaving and Related Topics and look under monographs, you will find a 1.4 Mb PDF file of a 1988 typewritten booklet by Karen Madigan of Australia called T-Shirt Yarns: How to Recycle T-Shirts, Etc..

Direct link to the 1.4 Mb PDF file

I never saw this booklet before I stumbled across it at the On-Line Digital Archive just now (April 2010), but in 1988 I was doing a lot of weaving, some of it with t-shirt yarn!

Labels: , , ,

16 March 2007

Knitting At Extremes

Weather extremes and size extremes.

Monday's high temperature was 69 degrees F. Today's predicted high is "mid-30's", so if we guess 35 degrees, the high today will be about half the high on Monday.

Monday night's low was 64 degrees -- this morning the temperature was 21 when I woke up. Michigan weather is nothing if not a roller-coaster ride.

In the picture, the extremes of size that I am knitting. At the large end of the spectrum, a rug on a US size 13 circular needle. The material is worn out polyester-cotton t-shirts, spiral-cut into one long piece.

At the small end, I am reaching the end of my knitted miser's purse, with about an inch or so more to knit. (At 20 rows to the inch!) The thread is size 30 crochet cotton, and the needles are alternating size 000 (blue) and size 0000 (silver).

I haven't been able to bring myself to knit on this purse for months, not because of the size, but because it was gleefully pointed out to me that it looked like I was knitting a condom. [rolls eyes] Well, that put me right off knitting on it. Now that I'm back at it, I'm determined to finish it, no matter what it looks like, and even if I can't find small enough rings to slide onto the center.

I am getting so used to knitting on the 3-0's and 4-0's that I was thinking the blue 000's were the "big" 00's from the Susan Bates sock set. But I went and looked, and no, the red ones are the "big" 00's.

Pi shawl update: I love it even more now that I've used it for a month. It's very handy on a cold morning to just throw it over my shoulders and type away. Now my hands are thinking they need a pair of muffetees, since they are all that stick out from the edge of the shawl when I type.

Labels: , , ,


Contents copyright © 2005-2012 Lynn Carpenter